Audio, Acoustics, and Video in the Worship Setting – Part 3
Audio, Acoustics, and Video in the Worship Setting
Part 3: Sound System Layout and Setup
Welcome back! We have talked about acoustic principles that directly impact how successful a sound system will be in the worship space. We have also talked about sound itself and how best to project it for clear hearing within the worship setting.
In this article we go one step further and explore system setup in two ways. First, initial setup: how we lay out the sound system from input (microphone, electronic instrument, or playback device) to output (loudspeaker, recording device, or video feed). Second, we look at what a good sound system designer and tuner strives for when setting up the system after the physical installation is complete.
I will include several “gotcha’s” along the way. And, Aunt Tilly and Uncle Charlie are still with us. You see, they try to hear the message when they go to worship. But they haven’t been able to hear it clearly. They’ve been following our discussion. They want to know more so that they can talk to their pastor and congregation leaders about improving the situation. Let’s get to it!
Sound System Layout
In its simplest form, the sound system consists of several basic components: the input device, the mixer, the signal processor, the power amplifier, and the loudspeaker. The signal follows a path as shown in the figure to the below.
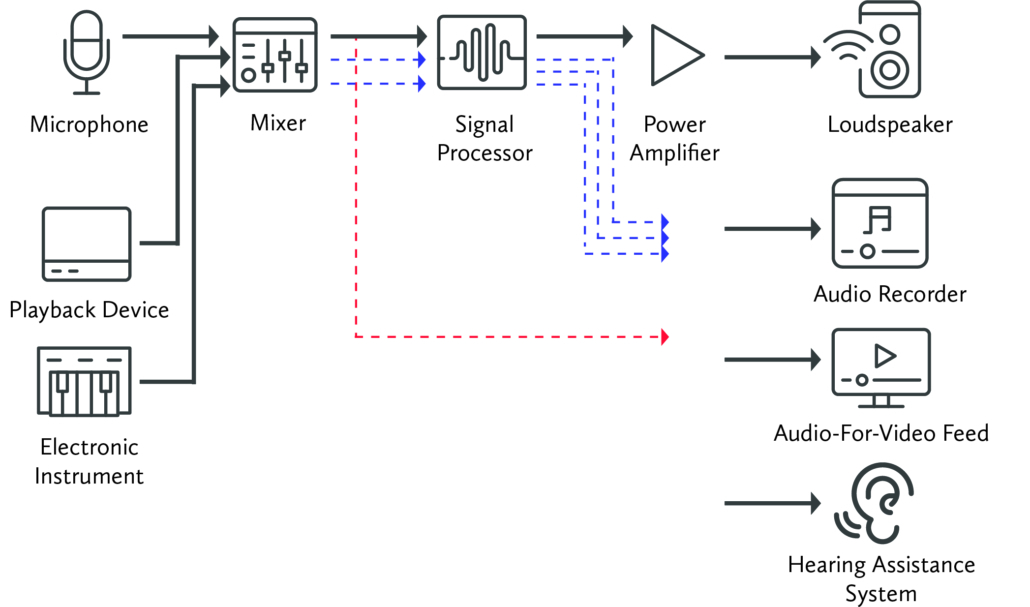
Diagram of a basic sound system.
How do we “make” sound through the sound system? Think of baking a loaf of bread. The “bread” is our sound. The “ingredients” are the signals we put into the system via the input devices, from microphones to playback devices to electronic instruments. The mixer is just that. This device, which comes in various forms and sizes, takes those sound ingredients and allows us to mix them together in the needed proportion—more vocal than drum in the modern liturgical ensemble, for instance—and produces the signal or “dough” that will eventually be finished.
However, we must do something more with that dough. We must prepare it, or “process” it, so that it comes out right when projected from the loudspeaker. Does the sound need more or less bass or treble? Do some frequencies produce feedback due to reflection off walls, microphone choices, loudspeaker positioning, etc.? The signal processor provides us with all the tools we need to prepare that sound properly so Aunt Tilly and Uncle Charlie will be pleased. The processor, back in the 1950s, was as simple as a tone control on a car radio. It then became an equalizer in the 1960s and 1970s as engineers such as Charles Boner and Bob Coffeen (a mentor of mine) and companies such as Altec Lansing developed the tools that allow us to break the “dough” or raw sound into many pieces and have finer adjustment control over the signal.
Aunt Tilly and Uncle Charlie will be pleased.
In the late 1990’s we witnessed the advent of digital tools that now allow for precision far beyond what early pioneers ever thought possible. A digital signal processor is not just a fancy tone control but a virtual toolbox that allows remarkable control over a number of factors:
- Adjust frequency response (tone).
- Synchronize multiple speakers in time using time delay.
- Set limits on the strength of the sound coming out of the device in order to protect the loudspeakers.
- Internally mix and route the signal to device outputs of choice such as the main loudspeaker, the cry room speaker, the recording device, the audio-for-video feed.
- Setting memory presets to recall things like system configurations for varying worship settings, differing attendance levels, and speaker zone on/off.
- Automatic mixing for voice mics to keep levels consistent and to minimize the potential for feedback from excessive volume.
- Wireless remote control that allows for simple control without the need for a mixing console where one is not required.
Digital tools allow for precision far beyond what early pioneers ever thought possible.
Once we have prepared that sound “dough,” it is sent to the power amplifier. This is the oven that makes the sound level rise like yeast in the bread to the level (volume) we need to deliver a pleasing “loaf of bread” which we call “sound” for Aunt Tilly and her fellow worshipers to hear from the loudspeakers.
The rudimentary schematic diagram above can be simple or complex depending on a number of variables. A good system designer will use information regarding the size of the worship space, the number of loudspeakers required to provide good coverage and clarity, the number of inputs required from microphones and such, and the number of output devices required—such as feeds to video recording, live streaming, audio recording, subsystems such as musicians’ monitor speakers, feeds to fellowship/social halls, etc.
In a simpler system design where there is no modern instrumental ensemble (or only a very small one), with a limited number of microphones, the mixer and signal processor may well be one unit. Coupled with a wireless remote device (some are simply wi-fi based as opposed to a specific Apple or Android app), all the mixing, signal processing, and signal routing can be handled from that one device, saving cost and operational complexity.
On the other hand, a mixing console may be required for a larger liturgical ensemble. In that case you need the ability to mix sound from a much more hands-on perspective. But be prepared! With that console comes the need to have a trained operator who is willing to learn its features and make adjustments on the fly. And that console will need to be located in a place where the operator can hear as the congregation hears. If you stick the operator in the corner of a balcony, then you have placed your control in another room where levels and tone will most likely be different than on the main floor. In that case Aunt Tilly will not be happy.
Going to the output side of the signal flow, notice the colored dotted lines going toward the output devices. These help me to address a common and significant “gotcha.” I get calls from pastors and church system operators complaining that the levels are bad on the audio recording. Sometimes they tell me that the level is low and that turning up the level results in feedback from the loudspeakers in church. From this description I can tell the caller that the system is configured too simply. The issue most likely stems from the fact that the signal to the loudspeakers and the signal to the recording feed come from the same control. The system designer did not build in flexibility to allow for separate control of main loudspeakers and other feeds. A separate mix and master level control are needed for the recording feed (or other feed) apart from the mix for the main loudspeakers.
A design using the “best bargain” method is a waste of money.
Sometimes this “gotcha” is due to a perceived budget limitation. “We can’t spend much on the system.” So the congregation settles for gear that is not flexible or not expandable. The result is that the system will not do what is needed. And the solution is to start over, which means spending the money twice to get the job done right once. The real solution is to be honest about needs and have the system designed to the need rather than to say “This is what we are going to spend.” This doesn’t imply spending a fortune on a sound system. But it does mean that a design using the “best bargain” method is a waste of money and never ends well. Design the system to the need, and make it expandable so that additions can be made without the need to start over. It costs a little more on the front end but saves a great deal in the future.
Another “gotcha:” The pastor calls and reports a hum in the audio going to our video recording. After I complete my groaner joke (“It hums because it doesn’t know the words.”), I ask questions about how the hookup is accomplished, what the devices are, and other qualifiers. The cause and solution are common. Outside of a cable that has gone bad, the most common cause for the hum is that a cable is not right for the situation. Most “off-the-shelf” hi-fi type cables with phono type connectors accept noise from other sources, induced into the line. Or the grounding is not right. The hum is the result. Make sure that you are using high-quality cables that will ground the devices properly, and make the proper connections to prevent outside noise from getting into the line.
One more “gotcha:” The level is strong coming out of the audio device, but is weak or nonexistent going into the recording device (may also be from playback device or electronic instrument going into the mixer). This is almost always an impedance mismatch. Simply put, there is an electronic roadblock that prevents the signal from getting to where it is supposed to go. In such cases, you need a transformer device that will correct for the mismatch. Since there are varying levels of quality, contact your sound professional for advice on which device to use. Make sure that you are using high-quality devices, both audio and video.
Books have been written on the subject of system layout. The brief description provided here will suffice for now, along with this summary: figure out what you need, design to that need (by a professional), build in flexibility and expansion capability, and utilize the right loudspeakers and microphones.
Sound System Setup
I state up front that the following discussion is not a “how-to-guide” so that you can tune your own system. Just as it takes education and experience to be a good pastor or music director, it takes education and experience along with a trained ear to be a good system tuner or “setter-upper.” Below I point out goals to accomplish when tuning a system. Remember: go to a professional for system design and for system setup/tuning!
Recall from our previous installments that there are some fundamental “must-do/must-have” matters when considering sound system design and setup—and ultimately tuning:
- Good acoustical character that matches the worship setting.
- Avoid destructive “slap” and “flutter” echo.
- Balance reflective, absorptive, and diffusive elements in the space.
- Design loudspeaker system to work in the acoustic space.
- Use the proper types of microphones for the various applications within the worship setting.
- Use proper mic technique.
I assume now that we have followed all of these principles of good design. We have good mics in place. The loudspeakers have been carefully selected and located. The mixer and signal processor are appropriate for the situation. We’re ready to tune!
First, what is my goal? Assuming that we will have good loudspeaker coverage, our goal is simply to deliver the most natural sound possible, clearly and without feedback. If there are supplemental speakers, under the balcony for example, then we also must synchronize these speakers in time with the main speakers so that every worshiper perceives the chancel as the source of the sound.
Second, achieving the goal. Clarity will result in part by having a well-behaved acoustic space and in part by selecting the proper loudspeaker. Notice I say nothing about the prettiest loudspeaker or the most invisible. We always work hard to blend the speakers into the architecture and make them as inconspicuous as possible. But if we lean too far toward aesthetic priorities, then clarity will nearly always be compromised.
To achieve natural sound without feedback, we start with a high-quality speaker that is proven to deliver smooth frequency response “out of the box.” Look at the graph below from a recent project where we measured the balcony support speakers. It shows an even frequency response from the lower-midrange frequencies through the upper end of the speech range. Frequency is shown on the bottom/horizontal axis, and level in dB is shown on the left/vertical axis.
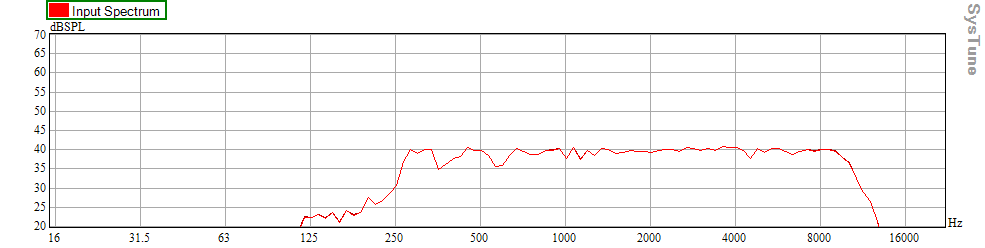
Frequency response graph showing natural sound
Notice that there are no jumps or peaks in response across our measurement range. The graph shows me—and my ears heard—that the sound is natural. And since there are no big peaks, feedback will not be an issue.
Why no issue with feedback? Feedback occurs when sound is allowed back into the microphone. It could be from a reflection, or it could be from poor mic placement. If there is a big peak in response (greater than 2 or 3dB above the average), a significant amount of energy will be allowed back into the microphone, creating a loop we hear as a screeching sound—feedback. Since there are no peaks here, we have no issue with feedback.
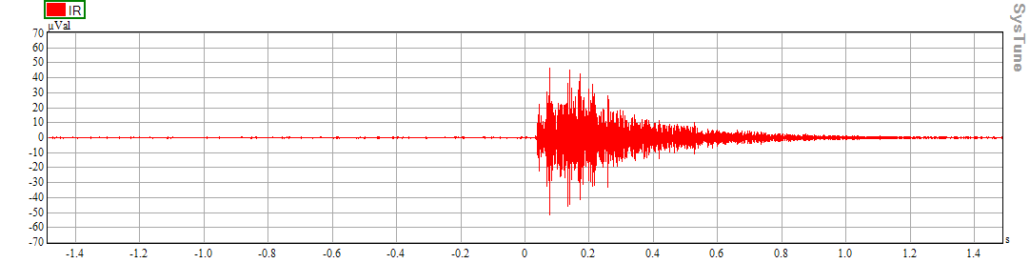
While in the tuning process, I will check to see how direct the sound is. What is the level of the sound coming to the ear directly from the loudspeaker as compared to reflected sound? The graph below shows a measurement of the direct sound. The left/vertical axis is level, and the bottom/horizontal axis is time in fractions of seconds. I want to see a very strong initial sound arrival, and either no or very little late arrival from reflection.
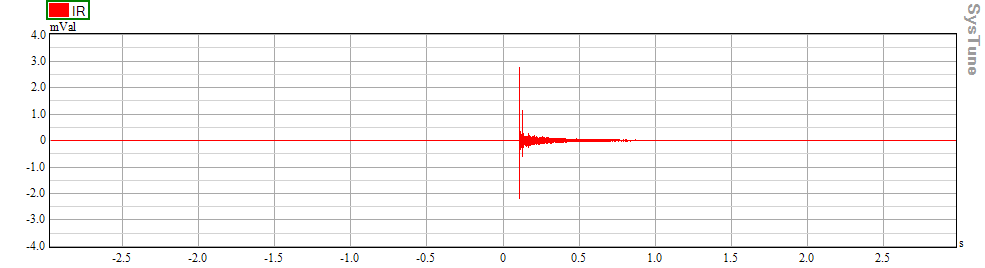
Graph measuring direct sound – shows no echo
Notice the tall vertical line just to the right of ‘0’. The ‘0’ point is the loudspeaker’s place in time. The tall line is the first sound arrival. There is a second line close to but far down in level. This graph shows me (and again, my ears heard) very clear sound with no audible echo from any other source.
In the last graph below we have an example of how poor things can get when our basic principles are not followed. Notice the initial arrival followed by arrivals that are nearly as strong. This client hears the same syllable distinctly three times. In that case, I had to report to the client that “we have issues” with room acoustics or with loudspeaker layout or type. In this particular case the issues were with both room acoustics and loudspeaker layout.
Graph measuring direct sound – shows and echo
I have included a good deal of information here. It may be difficult to process it all, especially for those not familiar with all this “audio geek” stuff. If I have helped you to think a bit about your goals for sound in worship, what your real needs are, and how to meet your needs and goals, then I have accomplished my goal.
Sound design involves science, art, and experience.
Additionally, I hope it’s clear that far more goes into this sound thing than just going to the local music store (or going online), buying some stuff, and sticking it in the church. The process of sound design involves quite a bit of science (laws of physics that the good Lord gave us and has not yet repealed) as well as art and experience. Yes, it is a process. And knowing just a little about the process, from design to setup to proper operation, can help you to ask the right questions and to budget appropriately. Then you can be confident of achieving the best results, and God’s Word both spoken and sung will be clear to the congregation.
Knowing just a little about the process … can help you to ask the right questions.
A fourth installment will conclude this series. It will focus on assistance for the hearing impaired. We will review a few simple statistics to show that assistance is no longer just for older people. We will study two major methods for providing assistance—how they work and the benefits of each.
If you have something to ask or an issue to deal with, let me know at [email protected]. I will respond as time allows and might even prepare another WTL article in the future.
WORSHIP
Learn about how WELS is assisting congregations by encouraging worship that glorifies God and proclaims Christ’s love.
GIVE A GIFT
WELS Commission on Worship provides resources for individuals and families nationwide. Consider supporting these ministries with your prayers and gifts.
[fbcomments num=”5″]
